


Protecting critical facilities and their resources against intrusion and misuse of materials is a critical role consultants and security integrators deal with every day. There are many guidelines that have been released that provide information as to the type of security measures that should be considered when protecting these facilities. However, the details involved with making these measures a reality are often missing.
As the popular saying goes, “the devil is in the details.” These details contribute greatly to the installation and operational performance of such systems. Whether you are a security professional trying to secure the physical assets of your company, a consultant helping that owner or an integrator installing the system, remembering a few key tips can go a long way in ensuring the implementation meets the objective. Here are eight things to consider when designing a new camera-based security system, or when reviewing your existing one.
1. Understand your camera
Selection of a camera is often the easiest and most difficult aspect of the design. There are thousands of options out there, tons of spec sheets, IP or analogue, dome or bullet. The choices are overwhelming. However, several characteristics of the selected camera sensor have a major impact on the placement and resulting coverage. It is important to take the time to properly address these items.
Lens: This is where most people start. The first reaction is to get a wide lens to be able to view as much of your facility as possible. This is certainly a valid approach; just remember that widening the view essentially dilutes your pixels. You only have so many pixels and by widening the field of view you are spreading the same number of pixels over a wider area. One net result is the reduction in the achievable detection distance.
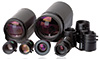
The converse approach is to select a very narrow lens to effectively increase the detection distance. This is also a common strategy, but don’t forget to think about the intended target size and speed. A narrow field of view means that the intruder has a shorter span of video to get across before being out of the camera view. The worst-case scenario is when the intruder is very close to the camera.
Resolution: This seems like an easy one. Higher resolution cameras give you more pixels, which in turn provide the ability to ‘see’ greater distances and more details, both with an operator at the helm or through the aid of a video analytics product. If you are not careful, though, this ability to ‘see’ more through higher resolution can be costly, as it can have a major impact on your network usage, storage costs and processing requirements.
The key is to understand what resolution is really required. To do that you need to know the smallest target you want to detect (human, car, etc.), how far away you want to detect that object, and how many pixels of resolution are required by your video analytics software or the eyesight of your security folks to be able to ‘see’ that object at the desired distance. Once you have that information, you can then go back to the camera specification and determine whether it can accommodate you with enough pixels.
Image sensor size: If you’ve spent time making camera selections, then you’ve seen camera specification sheets and have noticed image sensor sizes, including ¼-inch CCD and ½-inch CCD. When designing a robust perimeter system, always super-size, right? Perhaps, but suffice it to say that the camera sensor size impacts the resulting image of the camera. Most camera range calculators will assume you are using a ¼-inch CCD sensor. If you are not, then you should probably be in contact with your local camera layout expert to understand the effects of different size CCDs.
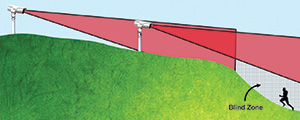
2. Consider the terrain
In addition to obvious obstructions such as trees and buildings, don’t forget to consider terrain variations, such as rolling hills, which may impact your blind zone calculations. Ditches and culverts can also prove to be a problem. Another obstruction that is often overlooked is the perimeter fence itself.
Looking through the fence can be very problematic based on the angle of the view and the type of fence in question. Even a chain link fence can appear solid when viewed from particular angles at certain times of the day.
3. Look to the future
This may seem silly, but plan for growth. In this case, it’s not about adding more cameras, increasing bandwidth or drive space, it’s about real growth. That cute little sapling may not impact the perimeter today, but in a few years, how will it impact your design? Will the tree obscure the camera’s field of view thereby creating safe passage for an intruder? You are thinking it’s just a tree. If it grows and becomes a problem just cut it down or keep it trimmed. Although that sounds logical, landscaping services are recurring costs, which are often harder to get approved versus the fixed cost of purchasing the perimeter system in the first place.
Sometimes looking to the future is just about asking the correct question. If the current design includes the protection of an open space or makeshift storage yard, take the time to enquire about the future use of the area.
4. Check your blind zone
Every camera has a blind zone. The size of that blind zone is determined by the camera lens, the mounting height of the camera and the mounting angle. Basic geometry will allow you to determine the effective blind zone of each camera. If you assume a human target, the blind zone begins at the mounting location of the camera. As the person walks away from the camera, the blind zone ends at the point where you can see their entire body in the video. That also explains why a good perimeter design includes both the maximum range and the minimum range for each camera.
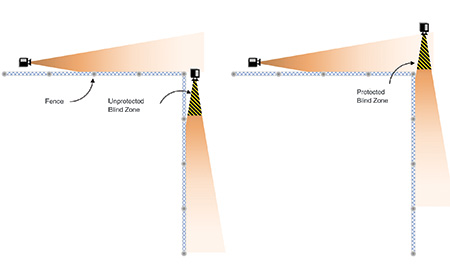
This is a pretty straightforward concept when you have one camera following another camera along a fence line. Where most blind zone mistakes occur is when the coverage takes a turn, for example, at the corner of a property. In these cases, the camera may need to be moved away from the fence corner to ensure coverage.
5. Don’t get stuck in the dark
It’s easy to get caught up in the perimeter layout, taking time to evaluate camera locations, lenses and image resolution only to forget that everything changes when the sun goes down. In most cases, the limiting factor in coverage occurs in the evening hours.
How do you intend to cover the scene in darkness? Will you use some type of illuminant, such as infrared or a visible light source, or perhaps a thermal sensor? A camera that can cover a 500 m fence line during the day may be reduced to 200 m at night due to the type of illumination being considered. This not only impacts the layout, but obviously has consequences on the final budget.
An infrared-illuminated camera will provide some facial details and can allow viewing of licence plates, but this adds a piece of equipment (mounting, power and maintenance) and is susceptible to weather conditions like rain, snow and fog. A thermal camera will cost you more and copes better with weather conditions, but won’t be able to provide facial or licence plate details.
6. Get an image
The saying is true. A picture is worth a thousand words. If at all possible, try to get an image from each proposed camera location, mimicking the intended view. Getting the image at about the same camera height is ideal, but just getting a snapshot at ground level can also be helpful.
If you are a consultant or integrator, this is often difficult to achieve given the nature of site visits and other restrictions, but it will provide an added level of confidence in your design and help retain some of those small details you may have forgotten after being on site. If you are the site owner or consultant, making the effort to allow these views to be captured can go a long way in uncovering problems early in the design. Images can be used as a great collaboration tool to gain consensus on the objective of the camera and ensure that the location and view will achieve the cameras’ intended mission.
7. A camera worksheet is key
Hopefully by now you realise that there are lots of little details that can get overlooked when planning to secure your facilities with video. What better way to capture all that info than in a simple camera worksheet?
Ask yourself: What is the objective of the camera? What is the brand and model? What lens is being used? Where is it to be located? How far does it need to detect? How will it be illuminated at night? Your worksheet doesn’t need to be overly complex, but it will save you hours of headaches by ensuring you have all the pertinent details for each camera location. Make sure to keep it updated. Although these types of tools are extremely important in the design phase, they are even more invaluable months into the installation if there are some unanticipated design changes.
PureTech has a free Camera Location Worksheet available for download at www.puretechsystems.com/camera-worksheet.html.
8. Use a camera layout tool
There are many different approaches to actually creating the final layout: the old T-square and triangle method, placing polygons on Google Earth, AutoCAD, PowerPoint, and vendor-specific tools.
In all cases, the objective is to get a visual representation of the protection to be provided by the cameras used in the perimeter layout. This layout can take into account all the items mentioned in this article and present them as a visual tool to facilitate responses to bids, discussions on budget, sensor selection, installation trade-off considerations and ultimately peace of mind that intended areas are fully covered.
The key to a good camera layout tool is one that takes into account the various aspects of the design (lens size, camera sensor, camera locations, blind zones), gives a good visual presentation of the final design and allows for easy modification as plans change. Taking the time to find a layout tool that works for you can save you a vast amount of time during all phases of a perimeter protection project. There are many security product suppliers and consultants that have access to these tools and are very willing to provide layout advice, in exchange for a chance to win your business for current or future security needs. Take advantage of their knowledge and the work they have invested in these types of application tools.
At first glance, the idea of using cameras to protect a perimeter, facility or other asset seems pretty easy. It’s something that integrators and security consultants do all the time. However, it is important to take the time to reflect on the fundamentals and reconsider the many details and aspects that can impact the effectiveness of the final design. Several key considerations have been highlighted in this article. Although this list should not be considered exhaustive, it’s hopefully a good starting point to build on.
Download the full white paper at http://bit.ly/8ThingsDL.
For more information, contact Eric Olson, PureTech Systems, +1 602 424 9842, eric.olson@puretechsystems.com, www.puretechsystems.com


© Technews Publishing (Pty) Ltd. | All Rights Reserved.
 printer friendly version